

If you’re getting into web security, at some point you have to stop just reading about vulnerabilities and actually build something broken with your own hands. That’s the fastest way to really understand how bugs like XSS happen in real apps.
So in this post, we are doing three things:
- Understanding how routing works in Flask (this is the backbone of literally every Flask app you will ever build or test), explained line by line
- Opening up Burp Suite and actually looking at what a request/response to a Flask route looks like – including what happens when you send GET, HEAD, POST, and DELETE to a route that only allows GET
- Building a small, intentionally vulnerable Flask app so you can see a real Reflected XSS bug from the developer’s side – not just the attacker’s side
This combo matters a lot. When you’re doing web pentesting or bug bounty later, knowing how the backend routes and handles input makes it way easier to guess where bugs are hiding, and knowing Flask’s default behavior means you can instantly tell when something in Burp looks “off.” Let’s jump into it!
Prerequisites
Before starting, make sure you have:
- Python 3 installed
- pip installed
- Burp Suite (Community edition is fine) if you want to follow the request/response section
Install Flask:
pip install flask
Part 1: Understanding Routes in Flask
What is a route, actually?
When someone visits a URL like http://yoursite.com/about, the browser sends a request to your server asking for whatever lives at /about. In Flask, a route is just a mapping between a URL path and a Python function that decides what to send back.
Think of your Flask app like a receptionist. Someone knocks on a door (/about), and the receptionist (Flask) looks at a list of instructions to figure out who should handle that visitor (which Python function should run).
The most basic route
Create a file called app.py:
from flask import Flask

app = Flask(__name__)

@app.route('/')
def home():
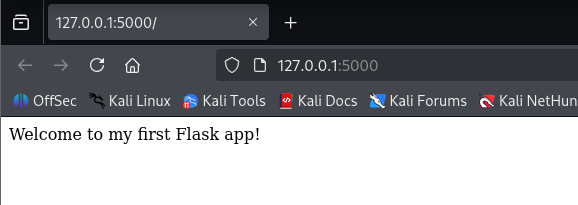
    return "Welcome to my first Flask app!"

if __name__ == '__main__':
    app.run(debug=True)
Let’s go through this every single line, because this exact structure is the skeleton of every Flask app you’ll ever look at:
from flask import Flask– Flask itself is a class, not a module-level function. This line pulls that class into our script so we can create an app object from it. Nothing runs yet, we’re just importing the tool.app = Flask(__name__)– This is where the actual application object gets created.__name__is a built-in Python variable that holds the name of the current module (in our case, since we’re running the file directly, it evaluates to"__main__"). Flask uses this internally to figure out the root path of your project, so it knows where to look for things like templates and static files later. Without this, Flask wouldn’t know where “home base” is on your filesystem.@app.route('/')– This line by itself does nothing visible, but it’s doing a lot behind the scenes. It’s a decorator, meaning it wraps the function defined right below it. What it actually does is callapp.add_url_rule('/', ...)under the hood, registering/in Flask’s internal URL map and pointing it at thehomefunction. Every time a request comes in, Flask checks this map to decide which function should handle it.def home():– This is called a view function. The namehomeisn’t special to Flask (you could call itindex,main, whatever) – but it does need to be unique across your app, because Flask uses it internally as an “endpoint name” for things likeurl_for().return "Welcome to my first Flask app!"– Whatever a view function returns becomes the HTTP response body. Flask automatically wraps this plain string into a properResponseobject with a200 OKstatus and aContent-Type: text/htmlheader, even though we never set those ourselves. This is Flask’s default behavior — return a string, get a 200.if __name__ == '__main__':– This is a standard Python guard. It makes sureapp.run()only executes if you run this file directly (python3 app.py), not if this file gets imported into another script.app.run(debug=True)– This starts Flask’s built-in development server (called Werkzeug), listening by default on127.0.0.1:5000.debug=Trueturns on auto-reloading (the server restarts itself when you save the file) and detailed in-browser error tracebacks. Never leavedebug=Trueon in production – it can leak your source code and even give remote code execution through the interactive debugger console.
Run it:
python3 app.py
Then open http://127.0.0.1:5000/ in your browser.
Adding more routes
You’re not limited to one route. Real apps have dozens or hundreds:
@app.route('/about')
def about():
    return "This is the about page."

@app.route('/contact')
def contact():
    return "Reach me at [email protected]"
Every route needs a unique path, but the function name can be almost anything (Flask uses the function name internally for url_for(), which we’ll touch on later).
Dynamic routes (variables in the URL)
This is where it gets more interesting – and it’s also where a LOT of real-world vulnerabilities start. You can capture parts of the URL as variables:
@app.route('/user/<username>')
def show_user(username):
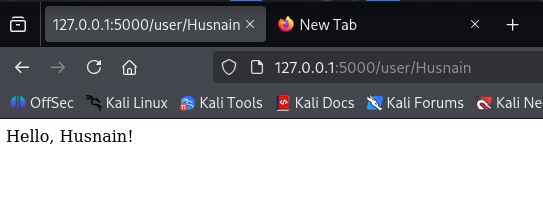
    return f"Hello, {username}!"
Breaking this down:
<username>inside the route string is a URL converter. Flask matches whatever text appears in that position of the URL and captures it as a string.- That captured value is automatically passed into the view function as an argument — notice
show_user(username)takes a parameter with the exact same name as what’s inside the angle brackets. If the names don’t match, Flask throws an error when the app starts. - Visiting
/user/husnainwill show “Hello, husnain!”
You can also enforce types:
@app.route('/post/<int:post_id>')
def show_post(post_id):
    return f"Showing post number {post_id}"
Here, int: is a converter type. Flask will only match this route if the URL segment is a valid integer, and it automatically converts it to a Python int before passing it in. If someone visits /post/abc instead of /post/5, Flask never even calls show_post() – it returns a 404 automatically, because abc fails the int conversion at the routing level, before your code runs at all.
HTTP methods (GET vs POST)
By default, a route only responds to GET requests. If you want a route to accept form submissions, you need to explicitly allow POST:
from flask import Flask
from flask import request

app = Flask(__name__)

@app.route('/login', methods=['GET', 'POST'])
def login():
    if request.method == 'POST':
        username = request.form.get('username')
        return f"Login attempt for: {username}"
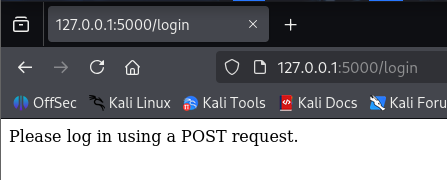
    return "Please log in using a POST request."
Explanation:
from flask import request–requestis a special Flask object that represents the incoming HTTP request currently being processed. It’s global-looking, but it’s actually context-local, meaning Flask makes sure it always refers to the correct request even if your server is handling multiple requests at once.methods=['GET', 'POST']– This explicitly tells Flask’s URL map that this route should accept both GET and POST requests, not just the default GET.request.method– This tells you which HTTP verb was used for the current request, as a string like'GET'or'POST'.request.form.get('username')–request.formis a dictionary-like object containing data submitted through a form withContent-Type: application/x-www-form-urlencodedormultipart/form-data..get()retrieves it safely (returnsNoneinstead of throwing an error if the key doesn’t exist).
This is important for us because request.form, request.args, and request.values are exactly where user input enters your app, and user input is exactly where vulnerabilities like XSS are born.
Quick recap of routing
| Concept | What it does |
|---|---|
@app.route('/path') | Maps a URL to a function |
<variable> | Captures part of the URL dynamically as a string |
<int:variable> | Captures and type-checks the value, 404s if it doesn’t match |
methods=['GET', 'POST'] | Controls which HTTP methods the route accepts |
request.args | Data from the URL query string (?name=husnain) |
request.form | Data submitted via a form (POST body) |
request.method | The HTTP verb of the current request |
Once this clicks, you’ll start looking at every URL in a bug bounty target and instantly thinking “okay, this is probably a route with a variable in it, what happens if I mess with that variable?”
Part 2: What Flask Routes Actually Look Like in Burp Suite
This is the part most tutorials skip, but it’s exactly what you need to get comfortable with as a pentester. Knowing Flask’s default behavior means you can immediately spot something unusual when you’re testing a real target.
Let’s take our /greet route from earlier (we’ll build the full vulnerable version in Part 3, but for now assume it just returns a greeting for GET requests)
from flask import Flask, request, render_template_string

app = Flask(__name__)

@app.route('/greet')
def greet():
    name = request.args.get('name', 'Guest')
    template = f"""
    <html>
        <body>
            <h1>Hello, {name}!</h1>
            <p>Welcome to the greeting page.</p>
        </body>
    </html>
    """
    return render_template_string(template)

if __name__ == '__main__':
    app.run(debug=True)
Just run this code for now; I will explain this code in part 3 😉
A normal GET request
Let’s analyze it in Burpsuite! Point your browser (with Burp’s proxy on) and send it to Repeater:
http://127.0.0.1:5000/greet?name=Husnain
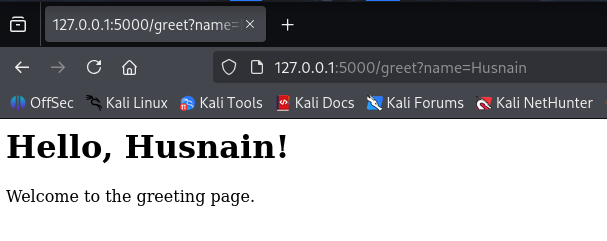
In Burp, the request and the response, straight from a real local run, look like this:
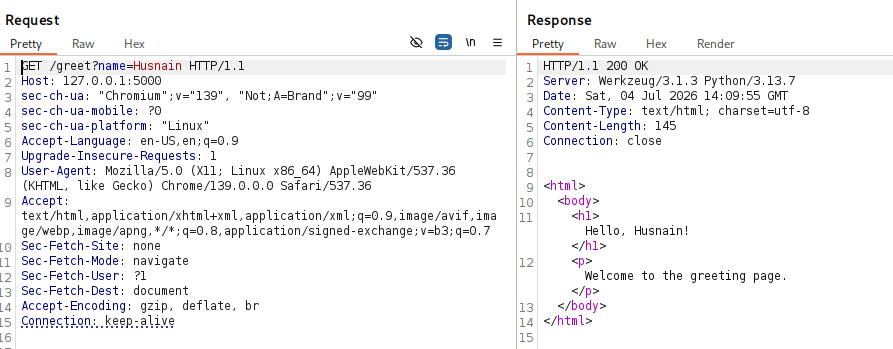
Two headers here are worth slowing down on because they tell you a lot as a tester:
Server: Werkzeug/3.1.3 Python/3.13.7 – this is Flask’s development server (Werkzeug) fingerprinting itself for you, for free. This immediately tells an attacker (or you, testing) that this is a Flask app running on the dev server, not a production WSGI server like Gunicorn. Seeing this header on a live target is a strong signal it might still be running in dev mode, which is a red flag worth digging into further.Connection: close– Werkzeug’s dev server closes the connection after each request by default rather than keeping it alive, unlike most production servers.
Sending a HEAD request
HEAD is basically “give me the headers you’d send for a GET, but skip the body.” Flask handles this automatically for any route that allows GET – you don’t have to write any extra code for it.
Change the method in Burp Repeater to HEAD and resend:
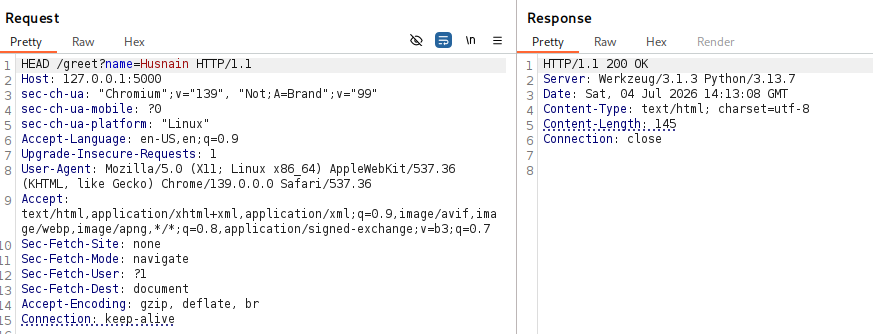
Notice the body is empty, but Content-Length: 145 still reports the size the body would have been if this were a GET. This comes straight from Werkzeug/Flask’s routing layer – whenever a route is registered for GET, Flask silently also registers it for HEAD and strips the body out right before sending the response. You never explicitly wrote a HEAD handler; Flask just gives it to you.
Sending a POST request (method not allowed)
Our /greet route was only ever registered for GET (remember, @app.route('/greet') defaults to methods=['GET']). Change the method in Burp to POST by right-clicking on the request -> Change Request Method and send it:
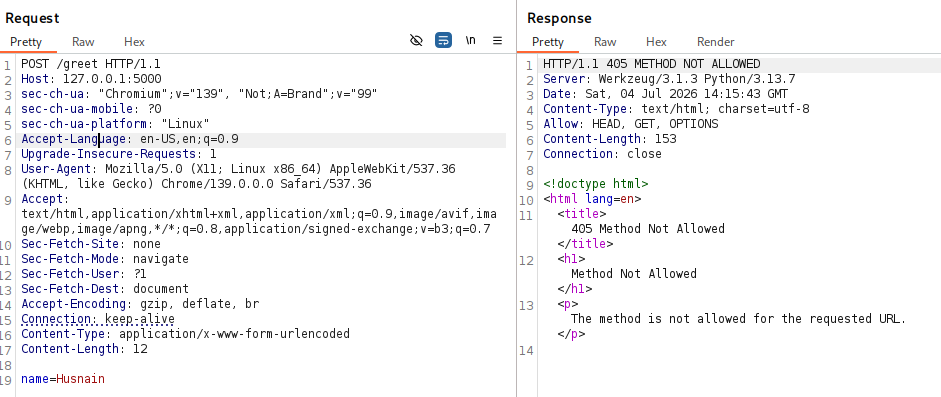
This 405 response comes from Werkzeug’s routing layer, not from any code you wrote – your greet() function never even runs. Before Flask calls your view function, it checks the URL map: it finds a match for the path /greet, but the method POST isn’t in the allowed list for that rule, so it short-circuits and returns 405 immediately.
The Allow: OPTIONS, GET, HEAD header is the interesting part from a recon perspective – it tells you exactly which methods this specific route accepts, straight from the server. As a tester, this header alone can save you time guessing.
Sending a DELETE request
Same story:
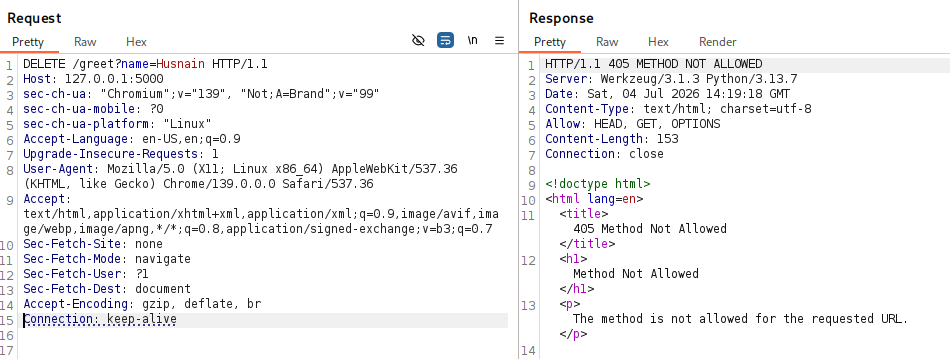
Identical structure to the POST response — same 405 status, same Allow header, same body. Flask doesn’t care which disallowed method you send; if it’s not in the route’s registered methods list, you get the same generic 405 every time.
Sending an OPTIONS request
This one’s automatic too, and it’s actually useful for recon:
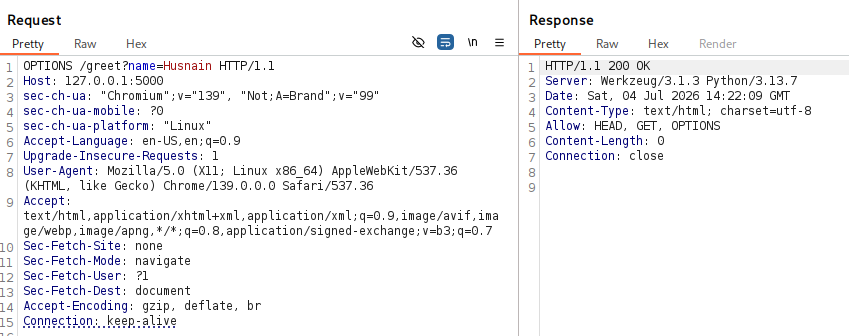
Flask auto-generates an OPTIONS handler for every route by default, unless you disable it explicitly with provide_automatic_options=False. It returns a 200 with an empty body and the same Allow header — this is basically the “clean,” documented way to ask a Flask endpoint “what methods do you support,” instead of throwing random verbs at it until something sticks.
What about a route that doesn’t exist at all?
For comparison, here’s what a totally undefined path returns – no matching entry in the URL map at all:
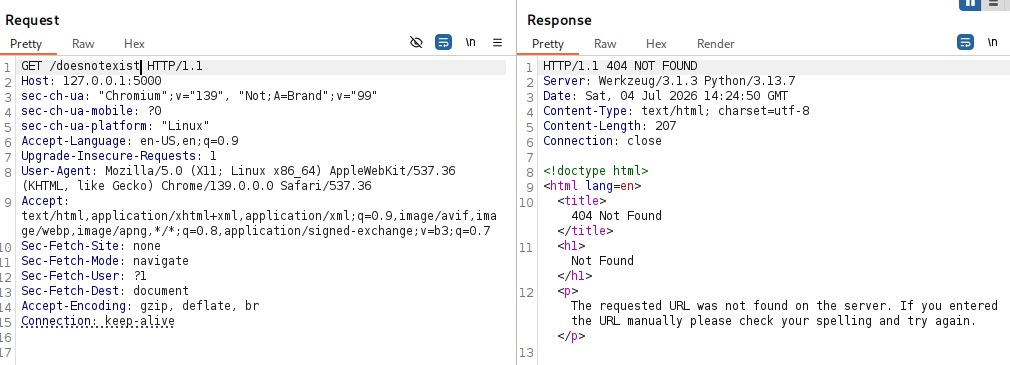
404 vs 405 is a meaningful distinction when you’re testing:
404means the path itself doesn’t exist in the URL map at all405means the path exists, but not for the method you used; which confirms the route is real, just guarded by method
If you’re fuzzing an API and get a 405 instead of a 404, that’s a strong signal you’ve found a real, live endpoint that just needs the right method (or the right body/headers) to actually respond properly. That’s a very different situation from a plain 404, and it’s the kind of detail that’s easy to miss if you’re only glancing at status codes without knowing this is Flask’s default behavior.
Quick recap of default Flask method behavior
| Method sent | Route registered for GET only | Where the response comes from |
|---|---|---|
| GET | 200 OK, full body | Your view function runs normally |
| HEAD | 200 OK, empty body, same headers | Auto-handled by Flask/Werkzeug, view function still runs but body is stripped |
| OPTIONS | 200 OK, empty body, Allow header lists methods | Auto-generated by Flask, view function never runs |
| POST / DELETE / PUT / etc. (not registered) | 405 Method Not Allowed | Werkzeug’s routing layer, before your view function runs |
| Undefined path entirely | 404 Not Found | Werkzeug’s routing layer, no matching rule found |
Part 3: Building Your First XSS-Vulnerable App
Now for the fun part. We’re going to build a tiny “greeting” app that takes your name from the URL and displays it back to you – and we’re going to build it the wrong way on purpose, so you can see exactly how Reflected XSS happens.
What is Reflected XSS, quickly
Reflected XSS happens when user input is taken from a request (like a URL parameter) and immediately echoed back into the HTML response without being sanitized or escaped. If the app just dumps your input straight into the page, and your input happens to contain a <script> tag, the browser will execute it.
The vulnerable code
from flask import Flask, request, render_template_string

app = Flask(__name__)

@app.route('/greet')
def greet():
    name = request.args.get('name', 'Guest')
    template = f"""
    <html>
        <body>
            <h1>Hello, {name}!</h1>
            <p>Welcome to the greeting page.</p>
        </body>
    </html>
    """
    return render_template_string(template)

if __name__ == '__main__':
    app.run(debug=True)
Let’s break down exactly why this is broken, one piece at a time:
name = request.args.get('name', 'Guest')–request.argsholds the query string parameters (everything after the?in the URL)..get('name', 'Guest')looks for a key callednameand returns its value; if it’s missing entirely, it falls back to the default string'Guest'. At this point,nameis 100% attacker-controlled data – Flask does zero validation or sanitization on it for you.template = f"""..."""– This is a Python f-string, which means any{expression}inside it gets evaluated and inserted as raw text at that exact spot, with absolutely no awareness that it’s about to become HTML. Python doesn’t know or care that{name}is going into an<h1>tag – it just does a literal string substitution.<h1>Hello, {name}!</h1>– this is the actual injection point. Whatever string is innamegets glued directly betweenHello,and!, character for character, with no escaping of<,>,",', or anything else that has special meaning in HTML.return render_template_string(template)–render_template_string()normally runs Jinja2’s templating engine, which would auto-escape variables; but only if we hand Jinja2 the variable properly (like{{ name }}). Here, we already bakednamedirectly into the raw string before Jinja2 ever sees it, using Python’s own f-string formatting. So by the time Jinja2 processes the template, there’s no{{ variable }}left to escape; it’s already just plain HTML text as far as Jinja2 is concerned. This is the core mistake: mixing Python string formatting with template rendering defeats the whole point of using a templating engine.
The problem in one sentence: we never checked, escaped, or sanitized name before putting it into HTML, and we bypassed the one built-in mechanism (Jinja2 auto-escaping) that would have protected us.
Testing it normally first
Run the app and visit:
http://127.0.0.1:5000/greet?name=Husnain
You’ll see a normal page:
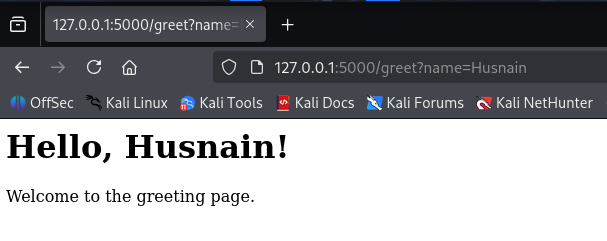
Now let’s break it
Try this URL instead:
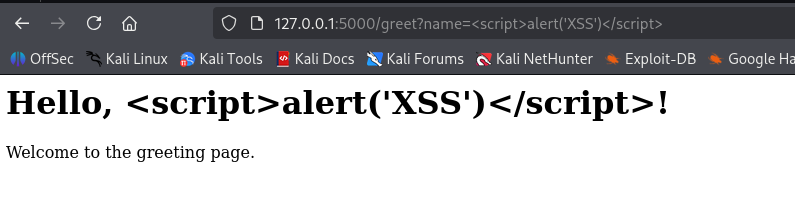
http://127.0.0.1:5000/greet?name=<script>alert('XSS')</script>
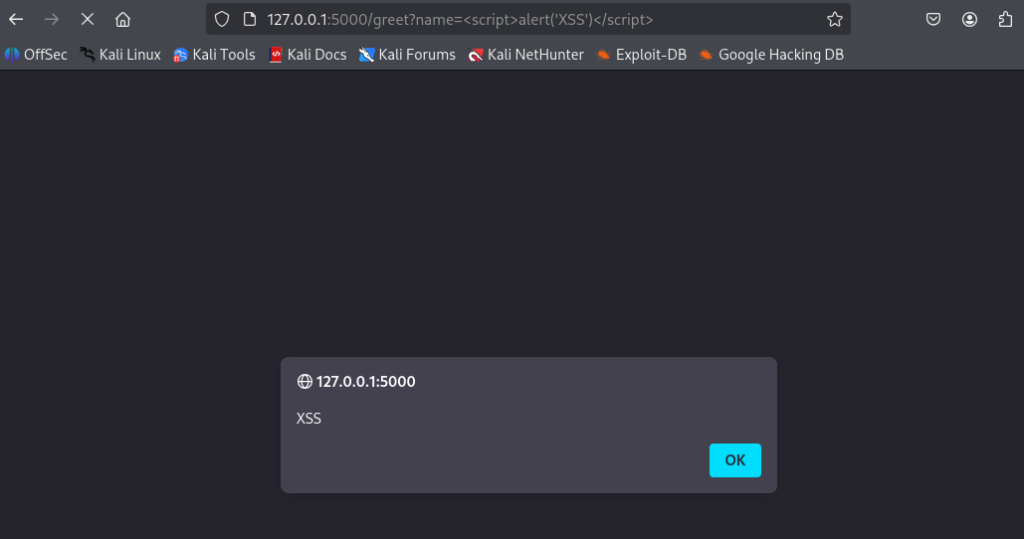
Instead of displaying the text <script>alert('XSS')</script> on the page, your browser will actually execute it, and you’ll get a popup alert box.
Why did that happen?
Because the server treated our input as trusted HTML instead of as plain text. The browser has no way of knowing the <script> tag came from a user input field rather than from the actual developer; it just sees valid HTML in the final page source and runs it, exactly like it would run any script tag written by hand.
In a real attack, alert('XSS') would obviously be replaced with something a lot nastier; stealing session cookies, redirecting the victim to a phishing page, silently submitting forms on their behalf, logging keystrokes, etc. The alert() box is just the “hello world” proof-of-concept every hacker uses to confirm the bug exists before escalating.
A couple more payloads to try
<img src=x onerror=alert('XSS')>
<svg onload=alert('XSS')>
These work because they don’t even need a <script> tag; any HTML element with an event handler attribute (onerror, onload, onclick, etc.) can be used to run JavaScript. The <img src=x> deliberately points to a broken image source, so the onerror event fires immediately.
How This Would Actually Be Fixed
Just so this post isn’t only “how to break it” – here’s the proper fix, so you understand the defensive side too. This part is worth understanding well since it usually comes up in interviews and real assessments.
The fix: never build HTML with raw string formatting. Use Jinja2 templates properly, and let auto-escaping do its job.
from flask import Flask, request, render_template_string

app = Flask(__name__)

@app.route('/greet')
def greet():
    name = request.args.get('name', 'Guest')
    template = """
    <html>
        <body>
            <h1>Hello, {{ name }}!</h1>
            <p>Welcome to the greeting page.</p>
        </body>
    </html>
    """
    return render_template_string(template, name=name)

if __name__ == '__main__':
    app.run(debug=True)
The changes, explained:
template = """..."""– this is now a regular (non-f) string, so{{ name }}is left untouched, exactly as written, when Python creates this string. It’s not evaluated by Python at all; it’s just literal text at this point.{{ name }}– this double-curly-brace syntax is Jinja2’s variable placeholder, not Python’s. Jinja2 only processes this oncerender_template_string()runs.render_template_string(template, name=name)– Here we passnameas a keyword argument, which becomes a variable inside Jinja2’s rendering context. Jinja2 substitutes{{ name }}with the value of that variable; and critically, Flask’s Jinja2 environment has autoescaping turned on by default for.htmltemplates andrender_template_string(). This means any<,>,&,", or'characters inside the value get converted into safe HTML entities (<,>, etc.) before being inserted into the page.
So <script> becomes the literal text <script> in the actual HTML source; the browser displays it as visible text on the page instead of parsing it as a tag.
Try the same payload again against this fixed version; you’ll just see the raw text printed on the page instead of a popup.
Key Takeaways
- Routes are how Flask maps URLs to Python functions; understanding them is step one for both building and breaking web apps
- Flask auto-handles HEAD and OPTIONS for any GET route, and returns 405 (with an
Allowheader) for methods that aren’t registered – all of this happens in Werkzeug’s routing layer, before your own code ever runs - 404 means the path doesn’t exist; 405 means the path exists but the method is wrong; a distinction worth watching for closely in Burp when you’re mapping out an API
request.args,request.form, andrequest.valuesare the entry points where user-controlled data enters your app; always treat this data as untrusted- Reflected XSS happens when that untrusted input gets echoed back into HTML without escaping; in our vulnerable app, this happened because we used an f-string to build HTML instead of letting Jinja2 handle it
- Never build HTML manually with f-strings or string concatenation; always let Jinja2’s auto-escaping do the work
- This same “unsanitized input → HTML output” pattern is exactly what you should be hunting for when testing real applications for XSS
That’s it for this one! Keep practicing this vulnerable app locally, try different payloads in Burp Repeater, and get comfortable with why they work, not just that they work.
If you like it, then comment! 😉